

During the Christmas holidays I've bought a new HP laptop with Windows 8.1 preinstalled. I'm not a fan of Microsoft operating systems but my wife is not addicted to Linux like me, so I have to manage the dual boot.
First Boot With Windows 8.1
After the initial configuration, where I've disabled every automatic update procedure, I've looked around to see changes compared to Windows 8. Well, there are three main difference I've noticed:
- at startup you get transported directly to the Desktop,
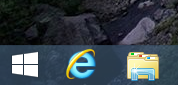
- there is a Window button in the bottom bar (see image) that opens the infamous tile screen, and
- while hovering the mouse of the top of applications with the new interface, a title bar with the X button appears.
Well, I've seen too much, let's start to do something serious... but, wait, who downloaded 20 MB from internet?
Partitioning
Hard disk is 1 TB but there are some extra partitions (rescue, boot loader and an unknown one) that reduce the available space to 900 MB. My idea was to have two 250 MB partitions (Windows and Linux) and the remaining space (about 400 MB) for the data.
So I tried to shrink the 900 MB partition with the Disk Management tool provided by Microsoft but the minimum allowed size was 800 MB. Remember, I've said to myself, defrag is your friend.
The last time I've run a defragmentation tool it was several years ago on Windows XP and I remember there was a graphical ribbon that showed used and free sectors. In that diagram, fixed (i.e. unmovable) files were shown with a different color. The last version of the defrag tool doesn't have that visual hint anymore. This lack could seem irrelevant, but it would have made me save a lot of time. Let's see why.
When the defrag ended its job, I was able to resize the partition, but the smallest size was about 455 MB. Still too much. So I tried to remove the so called crapware and run the defrag again. [Honestly, compared to my previous PCs, this time the unwanted/useless preinstalled software were very few.]
No results. The minimum size for that partition was always 455 MB. I tried to remove some other programs, reboot and run defrag again but nothing. So I did a quick search on internet and I found that other guys around the world have the same issue. They solved by using this free tool. And so did I. After a couple of hours I was eventually able to resize Windows partition.
Dealing With UEFI
In the meantime, I've prepared a bootable USB pen drive with Xubuntu 14.04 64 bits. Once plugged into the laptop, I expected that the system would automatically boot from there. No way. Windows boot started immediately and there where no indication about the key to press to enter the UEFI settings. I've had to reboot at least three times and to press as many F-keys as possible before being able to enter. So, the first thing was to set the waiting time to five seconds.
Then I've reshuffled the boot sequence, saved the changes and installed Xubuntu. After few minutes it ended, I rebooted and... Windows started. Reboot again, press ESC and a boot menu appeared. Now I was able to boot Linux but I was not satisfied: I want Xubuntu as the default choice.
So, since Google is my best friend, I've found in which UEFI submenu I had to select the Ubuntu bootloader instead of Windows one.
Finished? Not Yet
Well, let's see if I can access Windows filesystem from Linux.
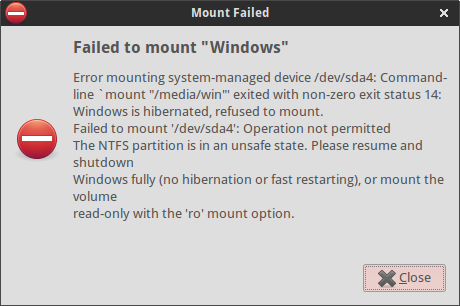
The key parts are the following:
Windows is hibernated, refused to mount.
and
Please resume and shutdown Windows fully (no hibernation or fast restarting)
The best way to resolve this issue is to disable the fast start. This function does not let Windows to shut down when you ask for it, but just hibernates it, to make next boot faster. This leaves the disk in a state that it's not safe to modify; for this reason, Linux refuses to mount it in read/write.
Conclusions
Before starting I thought it would have been more painful. It has taken more time than what should be, but fortunately I've been able to make the dual boot work properly without bothering too much.
Cover image created with Picfont.